Kanae Nishii, Michael Möller, Michelle Hart
Introduction
Next Generation Sequencing (NGS) (or Second Generation Sequencing) and the plethora of associated applications has revolutionised biodiversity research. The dream of whole genome sequencing for non-model organisms is now a reality as NGS technologies make it cheaper, faster, and generally accessible to all researchers. However, despite NGS being an extremely powerful technology, it does have its drawbacks, most notably relatively short sequence reads. Complex genomes often contain numerous repetitive sequences and the short sequence reads generated by NGS cannot fully span these repetitive regions. This results in misassemblies or incomplete genome assemblies.
Third-generation or long read sequencing technologies are being heralded as the third revolution in sequencing technology. Third-generation sequencing provides sequence reads of more than ten kilo base pairs. This significantly improves the efficiency of high quality genome assemblies, particularly when repetitive sequences are present.
The two most widely used technologies for third generation sequencing are Pacific Biosciences (PacBio) and Oxford Nanopore Technology. Both technologies generate sequence reads without artificial amplification. This means is it essential the input DNA is of a high integrity, purity, and concentration. Researchers often struggle at this first step – to extract a large quantity of pure high molecular weight DNA. Plants in particular present challenging material since they contain high amounts of secondary compounds such as polysaccharides. DNA extraction protocols for simple PCR experiments (1) mostly do not result in DNA suitable for long read NGS sequencing.
We have therefore developed a protocol for the extraction of high quality DNA from plant material that contains high amounts of secondary compounds, namely Streptocarpus (Gesneriaceae). This optimised protocol is based on those developed for Populus (2) and Arabidopsis (3) and uses a proprietary kit from QIAGEN – the QIAGEN Genomic-tip.
In the protocol described below, prior to DNA extraction, a step to isolate nuclei is included. This step reduces the amount of organelle DNA, i.e. chloroplast and mitochondrial and unwanted cytoplasmic components, thus increasing the read coverage of the targeted nuclear genome. The addition of a wash step with sorbitol buffer further improves the removal the secondary compounds (6).
Protocol
This protocol was developed for preparing high molecular weight nuclear DNA from Streptocarpus. We recommend starting with 10-20 g of young healthy leaf material, which can generate > 5-10 µg of purified nuclear DNA.
Before starting
Materials
This protocol includes β-mercaptoethanol and should be carried out in a fume hood or on a fume bench.
| Fume hood |
| Centrifuges for Falcon and Eppendorf tubes |
| Water bath |
| Spectrophotometer (e.g. NanoDrop, DeNovix) |
| Fluorometer (e.g. Qubit, DeNovix) |
| Nylon Mesh Filters: 40 µm, 100 µm (e.g. Corning #431750, #431752) |
| Sterile glass beakers: 250 ml, 50 ml |
| Clean pestle and mortar (1 per 1 g of sample) |
| Pipetmans and tips: 1 ml, 200 μl, 20 μl |
| Wide orifice 1 ml pipette tips (or cut off tip ends) |
| Falcon tubes: 50 ml, 15 ml |
| Eppendorf tubes: 2 ml, 1.5 ml |
| LoBind Eppendorf tubes: 2 ml |
| Liquid Nitrogen |
| Nuclei Isolation Buffer (see recipe below) |
| 10% Triton X-100 in NIB base solution (see recipe below) |
| Sorbitol Buffer (see recipe below) |
| Proteinase K (QIAGEN #19131) |
| RNaseA (Thermo Fisher #12091021) or RNase A/T1 Mix (Thermo Fisher #EN0551) |
| QIAGEN Genomic-tip 100/G (QIAGEN #10243) |
| QIAGEN Buffers: Buffer G2, Buffer QBT, Buffer QC, Buffer QF (QIAGEN #19060) |
| Isopropanol, ice cold |
| 3 M NaOAc |
| 70% Ethanol, ice cold |
| Polyvinyl polypyrrolidone (PVPP) |
- Nuclei Isolation Buffer (NIB)
Prepare stock of NIB base solution, store at 4oC. Spermidine and β-mercaptoethanol are added prior to use.
NIB base solution
10 mM Tris-HCL pH 9.5; 10 mM EDTA pH 8.0; 100 mM KCl; 500 mM Sucrose
NIB components added prior to use
Spermidine, final concentration 4 mM; β-mercaptoethanol, final concentration 0.1%
- 10% Triton X-100 in NIB base solution
To prepare, mix NIB base solution (without Spermidine and β-mercaptoethanol) and Triton X-100 in a 15 ml Falcon tube (pour Triton X-100, as it is a sticky liquid and pipetting does not work).
- Sorbitol Buffer (6)
Prepare stock of Sorbitol Buffer base solution and store at 4oC. PVP-40 and β-mercaptoethanol are added prior to use.
Sorbitol Buffer Base solution
100 mM Tris-HCl pH 8.0; 5 mM EDTA pH 8.0; 0.35 M Sorbitol, pH 8.0
Sorbitol Buffer components added prior to use
PVP-40, final concentration 1%; β-mercaptoethanol, final concentration 1%
- RNaseA or RNase A/T1 mix
Optional: We recommend incubating RNase A at 95°C for 5 minutes prior to use.
Procedure
Day 1 Nuclei isolation & polysaccharide removal
Grind plant tissue.
Prepare 100 ml of NIB per 10 g of fresh sample in a glass beaker, leave on ice.
- Cut 1 g of leaf tissue from the plant and transfer to a packet (Falcon tube or tinfoil packet) and place in liquid nitrogen. Cut a total of 10 g of material.
- Transfer 1 g of leaf material to the mortar. Add liquid nitrogen (enough to cover the tissue) and gently grind the tissue as the liquid nitrogen evaporates. Once the liquid nitrogen has evaporated, grind more vigorously for 30 seconds, until the material is a fine powder. Go immediately to next step – do not leave to thaw (Fig. 1).
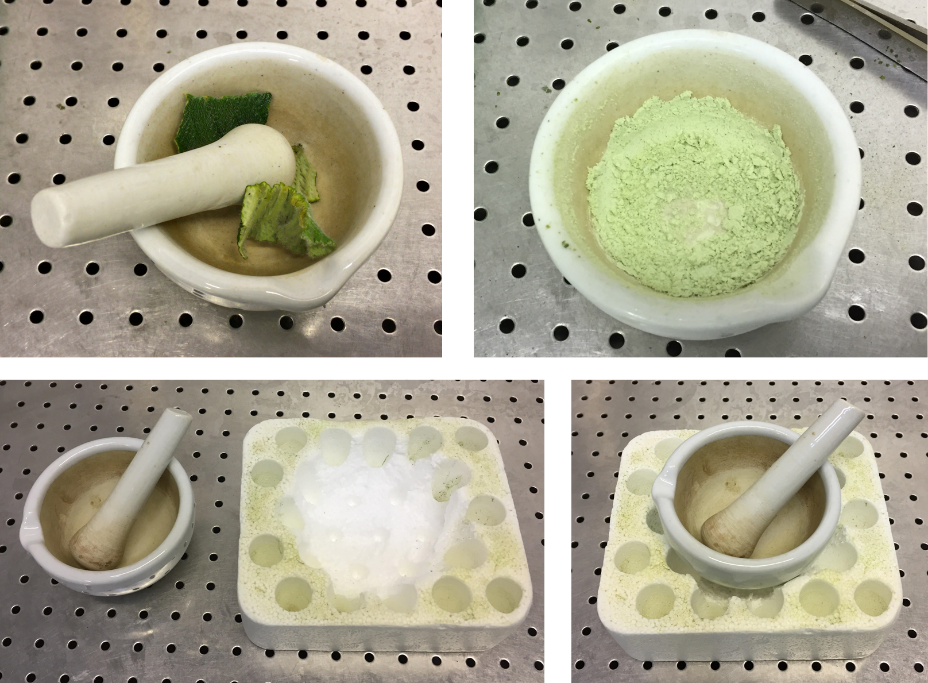
Fig. 1. 1 g of leaf sample in mortar (a) and ground with liquid nitrogen (b). Home-made mortar holder for liquid nitrogen grinding, made with Styrofoam (c,d).
3. Carefully add more liquid nitrogen and gently grind the tissue as the liquid nitrogen evaporates. Once the liquid nitrogen has evaporated, grind more vigorously for 30 seconds. Repeat one more time.
4. Transfer the ground tissue to the beaker of cold NI buffer and mix by gently swirling (Fig. 2). Keep on ice.
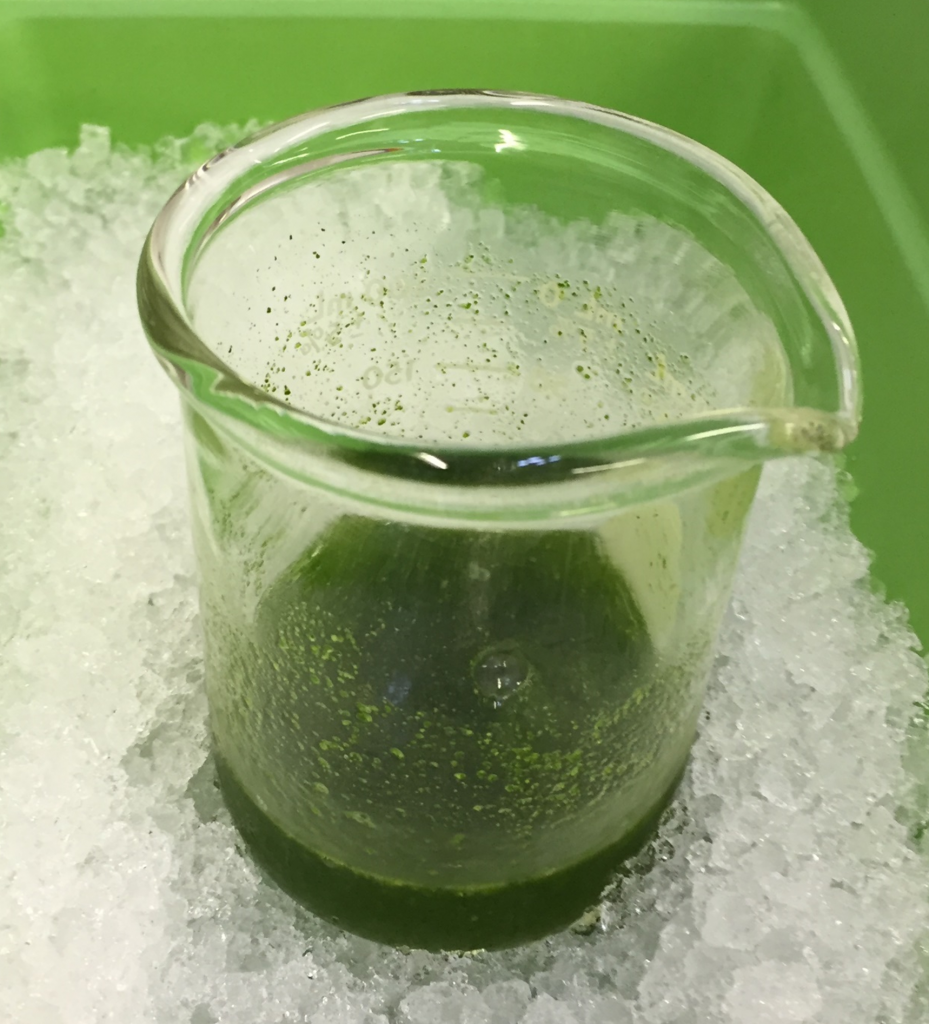
Fig. 2. Ground leaf material is NI buffer.
5. Repeat the above steps until all the tissue is ground. The mixture should be smooth with no clumps of material.
Filter to remove particulate material
NOTE: Keep both the ground tissue mixture and the filtrate on ice.
6. Place a 100 µm nylon mesh filter on top of a Falcon tube, and filter the NIB/sample solution. Do not force the sample through the filter.
7. Place a 40 µm nylon mesh on top of a fresh Falcon tube and filter the 100 µm mesh filtrate through the 40 µm nylon mesh.
8. Divide the solution equally into four Falcon tubes, with 25 – 30 ml in each.
Note: From step 8 onwards, the protocol and amounts apply to each of the four aliquots of filtrate.
9. Add 1/20th volume of 10% Triton-X diluted in NIB base solution and swirl the tubes to mix well.
10. Centrifuge at 2,000×g for 10 minutes.
11. Discard supernatant.
12. Add 20 ml Sorbitol buffer to the pellet in each tube and swirl the tubes to mix well.
13. Centrifuge at 4,500×g for 10 minutes.
14. Discard supernatant leaving the white nuclei pellet undisturbed (Fig. 3).
15. Invert tubes on tissue to remove traces of buffer.
Note: The nuclei pellet can now be stored at -80°C.
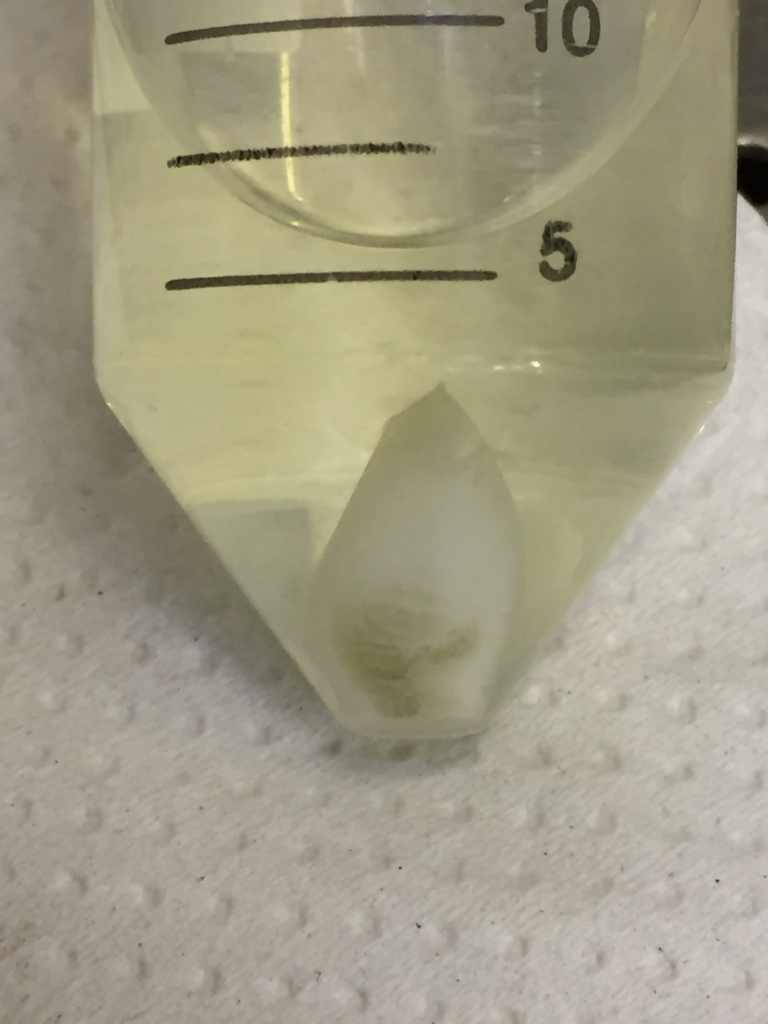
Fig. 3. Centrifuged sample after sorbitol buffer step.
Sample contains a small amount of intact cells (green) and a large amount of nuclei (white).
Cell Lysis
16. Set water bath to 50°C.
17. Add 5 ml of QIAGEN Buffer G2 to each 50 ml Falcon tube containing nuclei and gently resuspend the nuclei pellet.
18. Add 0.1% β-mercaptoethanol and a pinch of PVPP.
19. Swirl the tube to mix well.
20. Incubate at 50°C for 5 minutes.
21. Add 10 µl RNaseA or 50 μl RNase A/T1 Mix.
22. Gently swirl the tube to mix.
23. Incubate at 50°C for 5 minutes for RNaseA or 30 minutes for RNase A/T1 Mix.
24. Add 100 µl Proteinase K.
25. Swirl to mix well.
26. Incubate at 50°C for > 5 hours or overnight.
Day 2 QIAGEN Genomic-tip 100/G
Following protocol from page 49 of QIAGEN Genomic DNA Handbook 06/2015 (4).
At this stage in the protocol you will have approx. 20 ml of lysate (four tubes of approx. 5 ml lysates, obtained from 10 g of material ground in 100 ml NI buffer). We recommend you do not apply more than 7 ml of the lysate to a Genomic-tip 100/G column. The lysate contains contaminants and thus an excess amounts of contaminants can result in poor DNA quality and yield. Therefore, you have a choice of either a) re-using the Genomic-tip column to process the multiple 5 ml lysates from the same sample, or b) use a separate Genomic-tip column for each subsample. For speed and cost savings we use a combination of the two – two Genomic-tips per sample, reused once.
Before you begin
Set up Genomic-tip kit: Label 5 × 50 ml Falcon tubes as follows: 1. QBT, 2. Sample, 3. QC 1, 4. QC 2, 5. Final sample (Use a new Falcon tube for ‘5. Final sample’, the others can be washed, reused tubes). Optional: Save all the crude extracts and washes for analytical gels.
Pre-heat Buffer QF to 50°C in the water bath.
Genomic-tip DNA purification
- Place the Genomic-tip column mounted in the column holder on top of the tube labelled QBT (see Fig. 4).
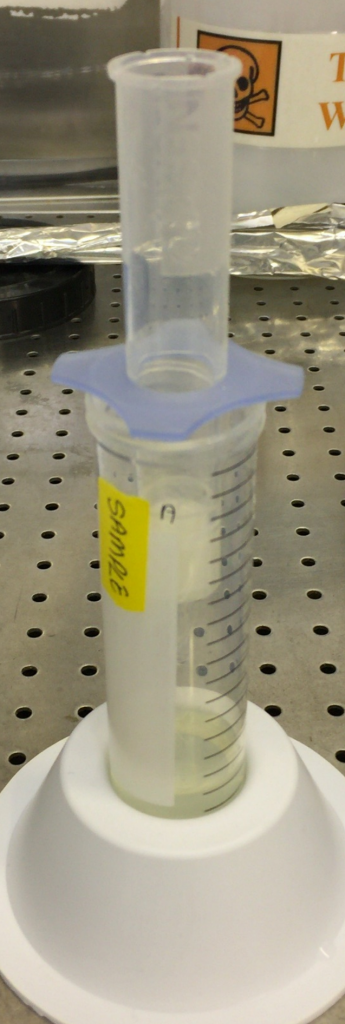
Fig. 4. Samples applied to Qiagen Genomic-tip 100/G column.
Lysate and buffers flow through the column by gravity.
2. Equilibrate a Genomic-tip 100/G column with 4 ml of Buffer QBT. Allow the QIAGEN Genomic-tip to empty by gravity flow, do not force the remaining buffer through.
3. Transfer the nuclei lysate from Day 1 to 2 ml tubes (approx. 1.5 ml of lysate, including precipitates, per 2 ml tube), centrifuge at 11,000 rpm for 10 minutes to obtain a clear lysate. Proceed immediately to step 4 and 5.
4. Move the Genomic-tip column to the ‘Sample’ tube.
5. Apply 5 ml of lysate to the equilibrated Genomic-tip.
6. Allow the column to empty by gravity flow.
7. Move the Genomic-tip column to the ‘QC 1’ tube.
8. Wash the Genomic-tip column with 7.5 ml of Buffer QC. Allow Buffer QC to move through the Genomic-tip by gravity flow.
9. Move the Genomic-tip column to the ‘QC 2’ tube.
Repeat the washing with 7.5 ml of Buffer QC. Allow Buffer QC to move through the Genomic-tip by gravity flow. Do not force out residual Buffer QC. Traces of Buffer QC will not affect the elution step.
10. Move the Genomic-tip column to the ‘Final Sample’ tube.
11. Elute the genomic DNA with 5 ml pre-warmed Buffer QF.
12. Store the eluted sample on ice.
Optional:
- If reusing the Genomic-tip, start processing the next batch of lysate from step 3.
- Wash the Genomic-tip 100/G column by applying 10 ml sterile water and allow the water to move through the column by gravity. Re-equilibrate the column with 5ml of QBT buffer and precede as before (step 4). The columns are stable after 6 hours from first equilibration. Do not dry columns.
DNA Precipitation
13. Transfer 1 ml of Buffer QF eluted sample to a 2 ml Eppendorf tube.
14. Add 700 µl of isopropanol and gently rock the tube to mix.
15. Leave samples at -20°C for > 2 hours or overnight.
Day 3 DNA precipitation and QC
DNA precipitation
- Centrifuge tubes at 11,000 rpm for 10 minutes.
- Discard the supernatant. Optional: retain supernatant for 2nd run through a Genomic-tip to maximise yield.
- Add 400 µl ice cold 70% Et-OH.
- Centrifuge at 11,000 rpm for 10 minutes.
- Discard the supernatant by tipping the tube, with pellet on the upper side, over a sterile glass beaker. Retain the supernatant until the safe recovery of the DNA pellet has been verified.
Note: Isopropanol pellets have a glassy appearance and may be difficult to see – often they appear (if at all!) as very fine small lines on the side of the tube. Mark which is the upper-side of the centrifuge tube to aid locating the pellet. Isopropanol pellets are also more loosely attached to the side of the tube so care should be taken when removing the supernatant.
6. Invert tubes on tissue to remove residual ethanol.
7. Air dry pellet for approximately 10 – 20 minutes to remove all trace of ethanol.
Note: Do not overdry the pellet as this will make the DNA difficult to dissolve and induce nicked-DNA damage.
8. Add 10 – 20 µl elution buffer (e.g. TE buffer).
Note: If the pellet is not visible, apply the elution buffer to the side of the tube where the pellet is expected to be. Gently flick the tube to rinse the elution buffer over the walls of the tube. Do not pipet or vortex the sample.
9. Leave at 50°C for 1 hour.
Note: High molecular weight DNA should be dissolved very gently to avoid shearing. We incubated the sample at 50°C in a ThermoMixer with gentle agitation at 300 rpm.
10. Collect DNA in two 2 ml tubes.
Optional: Check concentration with NanoDrop to estimate the final concentration. Perform a 2nd precipitation step if an increased concentration is required.
2nd precipitation
11. Add 1/10th volume of 3 M NaOAc and equal volume of ice-cold isopropanol.
12. Leave at -20°C, for more than 1 hour.
13. Centrifuge at 11,000 rpm for 10 minutes.
14. Discard the supernatant.
15. Add 1 ml 70% Et-OH.
16. Centrifuge at 11,000 rpm for 10 minutes.
17. Discard the supernatant.
18. Invert tubes on tissue to remove residual ethanol.
19. Air-dry pellet for approximately 10 – 20 minutes.
20. Elute in appropriate volume of elution buffer depending on the downstream application.
DNA quantitation and QC
We recommend performing the following QC checks:
- Quality check of DNA integrity by 0.8% agarose gel electrophoresis or Agilent Technologies TapeStation Genomic DNA ScreenTape.
- DNA quality assessment for OD values with a spectrophotometer such as NanoDrop or DeNovix.
- DNA quantity using a fluorometer such as the Qubit of DeNovix.
Note: The DNA concentration values from spectrophotometer and Qubit fluorometer assay should match in good quality DNA.
Note: The presence of residual RNA can be measured by Qubit RNA HS assay.
Results
This protocol resulted in high molecular DNA with optimal quality, OD260/OD230 = 2.09, OD260/OD280 = 1.85, and a DIN value of 8.5. The DNA amount obtained from 10 g of fresh Streptocarpus leaf tissue was approximately 4 µg. Fig. 5a shows DNA extracted using this protocol on a 0.8% agarose gel. Fig. 5b shows the Genomic TapeStation result.
PacBio sequencing was carried out at the Kazusa DNA Research Institute (Chiba, Japan), and a > 25 kb library was prepared for one cell of PacBio Sequel sequencing. It generated 12.75 Gb sequence data with a subread read length of N50 = 27,692 bp. This output is above the average value described on the sequencing facilities webpage and thus suggests the DNA extracted using this protocol is of a sufficient quality for PacBio long read sequencing.
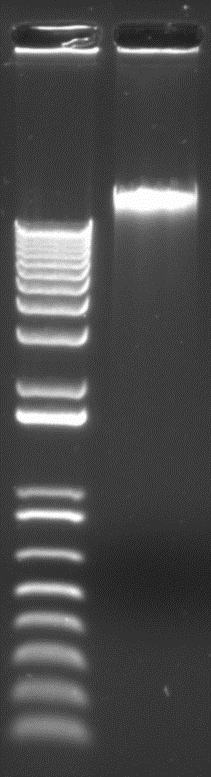
Fig. 5a Result of agarose gel electrophoresis. Left: 1kb+ DNA ladder, right: Streptocarpus genomic DNA
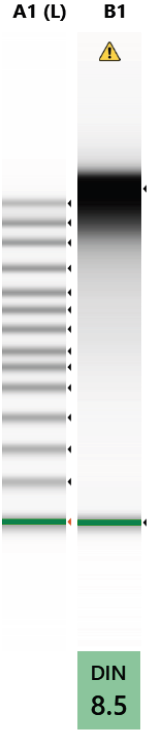
Fig. 5b Result of an Agilent Genomic ScreenTape. Left: Ladder, right: Streptocarpus genomic DNA.
DNA integrity number DIN 8.5
Discussion
Each plant species presents a different challenge for extracting high molecular weight DNA, in terms of amount of material available, ease of grinding, amount of secondary compounds present etc. The amount of DNA obtained per gram of Streptocarpus fresh leaf using this protocol is relatively low, compared to Arabidopsis (3[MH1] ). This might simply reflect the difficulty of extracting high quality DNA from this species. The protocol development notes at the end of this discussion outlines some of the other protocols we tried. These may work better for you.
The nuclei isolation step presented here is quick and easy to perform but is relatively crude. It does not completely remove intact cells smaller than the 40 μm mesh gauge. Thus the final extract did contain chloroplast and mitochondria DNA but at greatly reduced amounts. The biggest advantage of adding this step is the effective removal of secondary compounds prior to DNA extraction. Without the addition of this step, we have been unable to extract high quality DNA from Streptocarpus. There are numerous other protocols available for nuclear DNA purification, aimed at reducing the amount of plastid DNA rather than completely removing it. Many of these protocols are also optimized for specific plant species, tailored for example to amounts of secondary compounds or DNase present (7).
Conclusion
In conclusion, our efforts over the last 6 months have been worthwhile! We have achieved our primary aim of obtaining pure, high molecular weight DNA for long-read sequencing for genome assembly with the added bonus of reduced plastid reads. We hope this protocol and notes will be helpful for other researchers.
Protocol development notes
The pre-DNA extraction steps, such as the nuclear isolation step and sorbitol buffer wash, can be combined with other DNA extraction methods. We tested three additional methods: CTAB (Doyle and Doyle 1987), Plant DNeasy Plant Mini Kit (QIAGEN), and ChargeSwitch gDNA Plant Kit (Thermo Fisher Scientific) with the nuclei isolation step. For Streptocarpus, we found the quality of DNA extracted with DNeasy or ChargeSwitch kit to be lower or more variable than those with Genomic-tip (see table below). However, these kits might be useful for other plant species which contain lower amounts of secondary compounds.
| Extraction method | OD260/OD280 | OD260/OD230 |
| QIAGEN Genomic-tip | 1.85 | 2.09 |
| QIAGEN DNeasy Plant Mini Kit | 1.0-1.7 | 1.1-1.5 |
| ChargeSwitch gDNA Plant Kit | 0.7-1.9 | 0.2-0.3 |
We also tested alternative lysis buffers instead of QIAGEN Buffer G2 for Genomic-tip, namely CTAB buffer, and AP1 buffer from QIAGEN DNeasy Plant Kit.
CTAB protocol: The lysate in CTAB buffer was phase separated with equal volume of chloroform : isoamylalcohol (24:1) and centrifuged. The supernatant was diluted with one volume of distilled water, and pH adjusted to 7.0 using HCl prior to QIAGEN Genomic-tip application (5).
CTAB results: In Streptocarpus, lysis in CTAB resulted in similar amounts of DNA to that extracted using QIAGEN Buffer G2. However, CTAB lysis should be pH adjusted prior to loading onto the Genomic-tip, and this step requires extra caution since excess amount of HCl might cause acidity and thus DNA damage. Therefore, we decided to use Buffer G2 for ease of handling.
AP1 protocol: The lysate in AP1 buffer was centrifuged and the supernatant was applied to the QIAGEN Genomic-tip.
AP1 results: The DNA extraction using AP1 buffer as the lysis buffer failed completely. AP1 buffer contains SDS which interferes with the QIAGEN Genomic-tip chemistry (page 54 of QIAGEN Genomic DNA Handbook 06/2015; 4).
References
1. Doyle JJ, L. DJ (1987) A rapid DNA isolation procedure for small quantities of fresh leaf tissue. Phytochemical Bulletin 19: 11-15
2. Gunter L. (2019) Populus nuclear DNA purification using the QIAGEN Genomic-tip 100/G
Populus+nuclear+DNA+purification+with+Qiagen+Genomic-tip+100
3. PacBio SampleNet – Shared Protocol, Preparing Arabidopsis Genomic DNA for Size-Selected ~20 kb SMRTbell™ Libraries https://www.pacb.com/wp-content/uploads/2015/09/Shared-Protocol-Preparing-Arabidopsis-DNA-for-20-kb-SMRTbell-Libraries.pdf
4. QIAGEN Genomic DNA Handbook 06/2015. https://www.qiagen.com, HB-1163-002-1095823-HB Genomic DNA 0615 WW.pdf
5. QIAGEN handbook, Isolation of genomic DNA from plants (QG07.doc Sep-01), User-developed protocol, Isolation of genomic DNA from plants using the QIAGEN Genomic-tip. https://www.labviva.com/pub/static/frontend/Ueg/new/en_US/images/docs/QG07IsolationofgenomicDNAfromplantsusingtheQIAGENGenomic-tip.pdf
6. Souza HA, Muller LA, Brandao RL, Lovato MB (2012) Isolation of high quality and polysaccharide-free DNA from leaves of Dimorphandra mollis (Leguminosae), a tree from the Brazilian Cerrado. Genetic Molecular Research 11: 756-764
7. Lutz KA, Wenqin W, Zdepski A, Michael TP (2011) Isolation and analysis of high quality nuclear DNA with reduced organellar DNA for plant genome sequencing and resequencing. BMC Biotechnology 11: 54